
Friday, December 14, 2018
Thursday, December 13, 2018
Let me walk you through the first step on RetroPie
Where to get software and games, best links to read and gain information on this topic


https://retropie.org.uk/about/building/


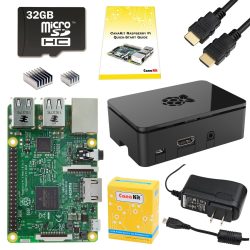
They currently recommend getting a Raspberry Pi 3 – as it is the best performing board for running RetroPie on.
Hardware:
Raspberry Pi 3
- Raspberry Pi (A, A+, B, B+, Zero, 2, 3)
- 5V 2.5A Power supply
- 8GB Micro SD Card Minimum
- HDMI or RCA 4 Pole Cables
- Gamepads and/or Keyboard
- Ethernet or Wifi dongle (built in on the pi 3)
- Raspberry Pi Case (optional but recommended)
- Micro SD Card Reader
https://retropie.org.uk/about/building/
SD cards
The SD card is a key part of the Raspberry Pi; it provides the initial storage for the Operating System and files. Storage can be extended through many types of USB connected peripherals.
When the Raspberry Pi is 'switched on', i.e. connected to a power supply, a special piece of code called the bootloader is executed, which reads more special code from the SD card that is used to start up the Raspberry Pi. If there is no SD card inserted, it will not start. Do NOT push in or pull out an SD card while the Raspberry Pi is connected to the power, as this is likely to corrupt the SD card data (you might get away with it, but it is best not to).
The SD card must be formatted, or written to, in a special way that means the Raspberry Pi can read the data it needs to start properly. If you are new to this check the instructions, or buy a pre-formatted SD card.
One advantage to using an SD card like this is that you can have several SD cards, each with a different operating system, or a different purpose. Simply power off, switch cards, and reconnect the power. You have a different computer to play with.
Please bear in mind that the maximum throughput of the card reader of the Raspberry Pi is 25 MB/s and that most likely read and write speed won't exceed 22 MB/s.
Which SD card?

SD cards come in three physical sizes (see picture). The Raspberry Pi A and B use the largest one; the miniSD card and the MicroSD card can be used in those models, but you will need an adapter / holder to fit it. The Raspberry Pi B+ and Raspberry Pi 2 Model B (second generation) require the smallest one, the MicroSD.
SD cards come in a range of storage sizes. You will likely need more than 2 GB.
Installation
Download
There are currently two versions of RetroPie. There is one version for Raspberry Pi 0/1 (Model A, A+, B, B+) and there is a version for Raspberry Pi 2/3.
Download the SD image for your version of Raspberry Pi from the following page:
If you are unsure which version of Raspberry Pi you have, you can count the raspberries on boot:
| Raspberry Pi 0/1 | Raspberry Pi 2/3 |
|---|---|
 |  |
If you get the error
Illegal Instruction when it boots or if it just boots into the terminal, you picked the wrong SD image or the image was corrupted on download or extraction.Extract
Once you have downloaded your SD card image you need to extract it using a program such as 7-Zip. You will extract the downloaded .gz file and the extracted file will be a .img file.
To extract from the command line, you can type the following into a Terminal window, placing X with version you downloaded:
gunzip retropie-4.X.X-rpi2_rpi3.img.gzInstall
To install the RetroPie SD image on your MicroSD card. (You may need a MicroSD card reader to plug it into your computer)
- For Windows you can use a Etcher or Win32DiskImager
- For macOS you can use Etcher or Apple Pi Baker
- For Linux you can use
ddcommand or Etcher
Note RetroPie is built on top of Raspbian Stretch (a linux based OS for the Raspberry Pi) and as such the partition on the SD card is EXT4 (a linux filesystem) which is not visible on windows systems, so the card will show up as a smaller size than usual and you wont be able to see everything on the card, but it is all there. You will be able to access the filesystem over the network as described in the transferring roms section below.
If you're updating from a previous version of retropie see HERE
https://github.com/RetroPie/RetroPie-Setup/wiki/First-Installation
https://elinux.org/RPi_SD_cards
https://retropie.org.uk/about/building/
https://retropie.org.uk/docs/First-Installation/
https://retropie.org.uk/docs/First-Installation/
Best recommendation to become a strong chess player
It is no accident that practically every great player had a bedside book, with well-annotated games, which he had read from cover to cover and knew practically by heart.
Sakaev, Konstantin; Landa, Konstantin (2016-12-30). The Complete Manual of Positional Chess: The Russian Chess School 2.0 – Opening and Middlegame (Kindle Location 117). New in Chess. Kindle Edition.
Sakaev, Konstantin; Landa, Konstantin (2016-12-30). The Complete Manual of Positional Chess: The Russian Chess School 2.0 – Opening and Middlegame (Kindle Location 117). New in Chess. Kindle Edition.
How to factory reset my Linksys RE6300 AC750 Boost Wi-Fi Range Extender? without the 10 second rule reset button

I fortunate have a laptop close to me and without connecting this laptop to his already router/modem (Gateway). I put an ethernet cord from laptop to the only port that this Linksys RE6300 AC750 Boost Wi-Fi Range Extender has in one side, then I went to IE and type its ip address 192.168.1.1 and the default password admin. the second step is to go to its property and click reset to default factory. the rest was easy, to make this wifi booster back to sync to my customer gateway by pressing the WPS button in both pieces of equipment

8. How do I reset my Linksys RE6300?
Press and hold the Reset button of your Linksys RE6300 for 10 seconds to reset the range extender to its factory defaults.( linksys official support,url/ https://www.linksys.com/us/support-article?articleNum=178005#si6)
Press and hold the Reset button of your Linksys RE6300 for 10 seconds to reset the range extender to its factory defaults.( linksys official support,url/ https://www.linksys.com/us/support-article?articleNum=178005#si6)
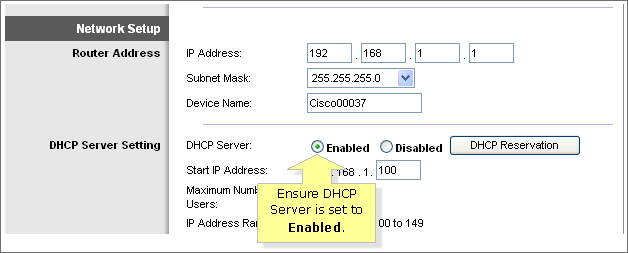
6. What is the default IP address and password of the Linksys RE6300?
The default IP address of the Linksys RE6300 is 192.168.1.1 and the default password is admin.
QUICK TIP: Once your extender is already configured you will need to look for the IP address in your router’s DHCP table. To know how to do this, click here. In this case, you may also easily access the web-based setup page of the Linksys RE6300 by entering “http://extender.linksys.com” in the Address bar or its friendly name “RE6300-xxx”, where xxx are the last three characters of its MAC address.( linksys official support,url/ https://www.linksys.com/us/support-article?articleNum=178005#si6)
References:
https://www.linksys.com/us/support-article/?articleNum=139502
https://www.linksys.com/us/support-article?articleNum=178005#si6
https://www.linksys.com/us/p/RE6300?gclid=CjwKCAiAo8jgBRAVEiwAJUXKqEbS2LVZadGfS-qVY4fm-6giiqGEBdEiwKbMhS8_vF6cG2_1zLtVjxoCLpgQAvD_BwE
Subscribe to:
Posts (Atom)